The Purse-seine, by Robinson Jeffers, 1937
.......I cannot tell you
How beautiful the scene is, and a little terrible,
then, when the crowded fish
Know they are caught, and wildly beat from one wall
to the other of their closing destiny the
phosphorescent
Water to a pool of flame, each beautiful slender body
sheeted with flame, like a live rocket
A comet's tail wake of clear yellow flame; while outside
the narrowing
Floats and cordage of the net great sea-lions come up
to watch, sighing in the dark; the vast walls
of night
Stand erect to the stars.
Lately I was looking from a night mountain-top
On a wide city, the colored splendor, galaxies of light:
how could I help but recall the seine-net
Gathering the luminous fish? I cannot tell you how
beautiful the city appeared, and a little terrible.
I thought, We have geared the machines and locked all together
into inter-dependence; we have built the great cities; now
There is no escape. We have gathered vast populations incapable
of free survival, insulated
From the strong earth, each person in himself helpless, on all
dependent. The circle is closed, and the net
Is being hauled in.......
Friday, June 11, 2010

Tuesday, February 2, 2010
Dynamite Crate Lamp Table.
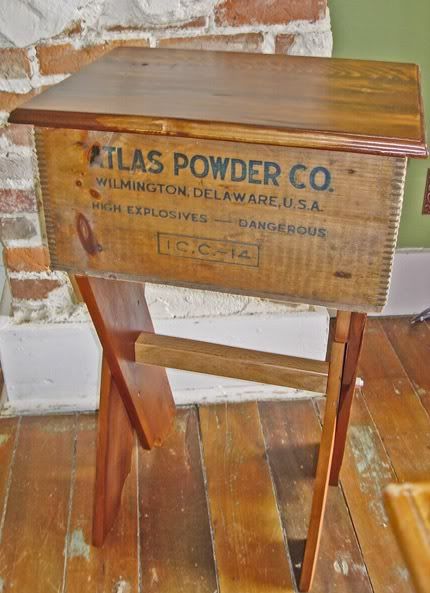 Dad found me this old Atlas Powder Company crate at a flea market a while ago. I knew I'd make a table out of it, similar to the Wine Crate end tables I've been doing.
I finally settled on a scissor leg design, with a trestle bar.
I wanted this to look both somewhat rustic, and a bit industrial at the same time. I was going for a look that felt as though it might have been assembled out of available materials at an exploratory mining encampment some time in the past.
To support that theme, I went with exposed nuts and washers on the outside of the cross legs, instead of the mortise and tenon joint I used with the wine crate tables. Since the legs overlap each other, I couldn't use the single broad cleat to hold the legs to the bottom of the crate. Instead, I made a pair of chevron shaped cleats for each end and attached them so that one would be seen from the outside, and the other would be hidden by a leg.
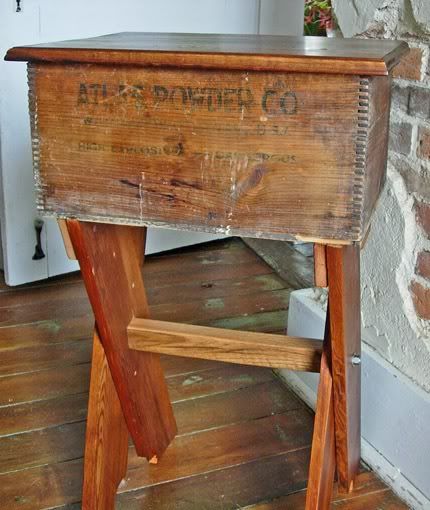 All the parts of the lamp table are salvaged material. The top and legs are made from very old pine planks from a set of shelving my grandmother used to hold homemade jelly and preserves in her basement. The growth rings in these boards are so tight and so numerous, that I can't count them. I suppose I could with a magnifying glass and a stylus, but it would take a while.
You just can't find wood like this now a days. Rings like this indicate a very slow growing and very old tree. We largely wasted the old growth forests of north America on frivolous crap that chokes the land fills now. But I suppose that's a rant for another day.
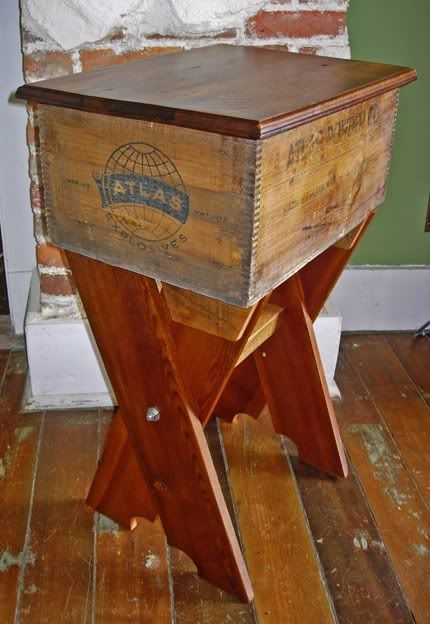 I gave the top a coat of Minwax Provencal stain, a medium dark and my personal favorite. I them sanded most of it off after it had dried. I purposely took off more stain in some areas than in others, to increase the variation in the appearance of the top.
 I really prefer the hand made look to furniture, and most other things really. I like it to the point of leaving dings, scratches and other damage in old materials so that they are obvious in the furniture I make from them.
I sold high end furniture for a long time, and I eventually realized I didn't much care for it. I think it's a problem that our culture of mass manufacture has made people intolerant of imperfection, and unable to appreciate the individual character of things that are made one at a time.
Mass production makes items available to greater numbers of people at a reduced cost, but it also reduces the value of the items produced. Nobody cares about the coffee table they got at Target, there's a million others just like it getting chucked in dumpsters when their badly designed joints give out.
Sorry, ranting again. Heh...
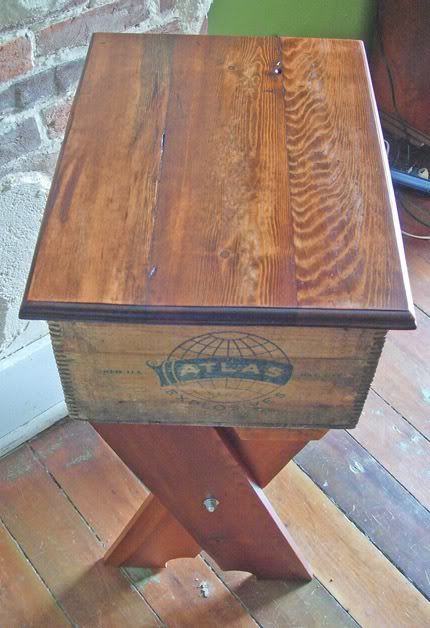 Anyway, I gave the top a few brushed coats of satin polyurethane, so that it would wear better. The powder box itself, I only gave a single thin sprayed coat. I wanted it to retain all of it's worn and faded appeal and remain distinct from the top and legs. The legs got two brushed coats as well.
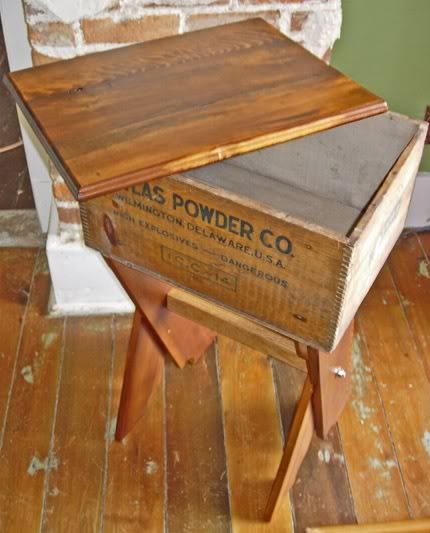 As with the wine crate tables, the top comes off so that the crate is available for storage.
The end of the crate is marked with "50, 4x16, Atlas Apex C, 15, 516, H.V.", I know the 5o means 50 lbs, and I assume the 4x16 refers to the size of the sticks of explosive the crate contained.
I haven't been able to find an identical crate online. Atlas made explosives for a variety of applications, but most of the crates I've seen were for coal mining explosives like Coalite. I know they ceased operations in the 60's, but from the condition of the crate, I believe it at least dates from the 40's.
If anyone can identify the age of the crate more accurately, I would appreciate hearing from you.
Wednesday, September 16, 2009
The Monrovia Festival, 2009
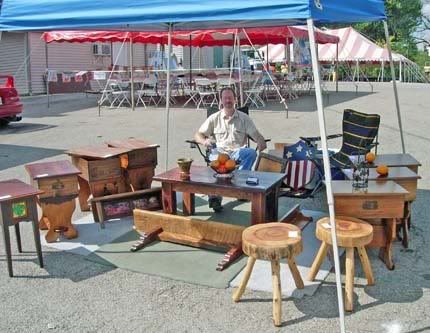 I got a little booth at the Monrovia Festival this year. Above is a pic of me and my display. I wasn't really sure that what I have to offer would go over well. A town festival isn't usually the sort of venue that people go to to look for furniture. Especially my own sort of one-off designs.
The whole thing turned out much better than I expected, however. I sold several pieces when I was really just hopeful for a couple of sales. I had to print more business cards as we went through what we had the first day.
The attendance was much larger than I expected, or remembered from previous years. I'm getting the feeling that people are choosing to attend smaller, local events like the Monrovia Festival, rather than drive farther, and spend more money at larger, events, or on travel and vacations. It seems that the failing economy is likely to force a re-invigoration of local economies and small scale crafts, as world-spanning businesses and supply chains become less viable.
This suites me just fine.
I also think that when people choose to spend their money, they will more and more pick items which are of higher quality, are unique, and will hold their value. I may just be projecting my wishes on the world here, but, I think, in an economy that is reality-based, and not a castle-in-the-sky of financial fantasy, long lasting items with character will have an edge over the mass-produced non-working replicas of real products which fill the bigboxes now.
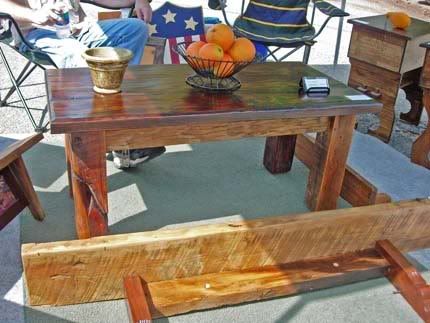 Here is a coffee table and mantle shelf I brought to the Festival. Both are from salvaged materials.
The coffee table is poplar,(top and apron), cedar and ash,(legs). Legs are an interesting find. They were cut from 4x4 beams that served as floor joists in a little barn that was torn down, and then dumped at the home of a friend of mine. He was just going to use the wood in a bonfire for a party, but he let me rummage through it first, knowing I love to salvage useful things, and I pulled out four beams. Three cedar and one ash.
the ash is pale and pretty straight, but the cedar is wainy and had lots of old checking and fractures. As soon as I cut it, it filled the shop with the scent of cedar oil, even though it's who knows how old.
The Mantle Shelf is white oak, and walnut, also an interesting story. The shelf itself was once part of a door frame in my basement, easily cut 160 years ago. I had to pull out the frame last fall to get the new furnace in. We also had to widen the opening in the wall, so the old frame couldn't go back.
In the pic, you can see the shallow curve of the saw blade that cut the plank in the first place. When I get some thing that proves the age and character of a piece of wood, I never take all of it off in the refinishing process. I love that sort of thing.
On the right end of the shelf, which you can't see in the picture, there is a large iron spike that was driven in to the door frame at some time. I don't know what for, but it looks great, and it's nearly impossible to get something like that out of old oak, so I left it in.
The corbels that support the shelf are walnut, and pieces I salvaged from the remains of a very old player piano. Just how old that piano was, I don't know, but most of it had collapsed into dust when I took it apart.
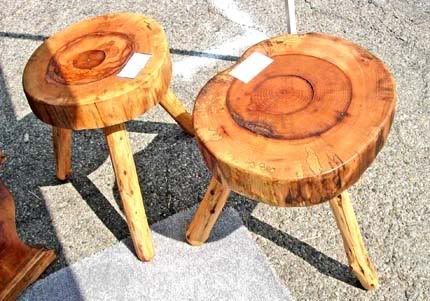 Here is a pair of tables/stools made of ash and cedar. Ash tops and cedar legs. The ash is from a downed tree back in the woods. It came down three years ago, and I'm pretty sure the ash borers are to blame for it's death. I'm seeing quite a few dying ash trees on the property now.
A log of that size, parts of it are more than two feet in diameter, needs a few years to dry out enough to be stable for furniture building. There was still some checking that appeared after I cut some plates for the tops, but I doubt it will cause any problems down the line.
The legs are from a standing dead cedar that was near by. It had been out competed for sunlight under the forest canopy and was already nice and dry. Also, the cedar oil is a great rot inhibitor.
I used an antique draw knife belonging to a friend to shave the legs down to a diameter for the tenons that plug into the mortises in the undersides of the plates. I had to use my clamping table to hold the legs while I shaved them, and it was a pain in the neck. Building a proper shaving horse for the shop is definitely on my too-do list now.
Friday, August 28, 2009
Platform bed on casters.
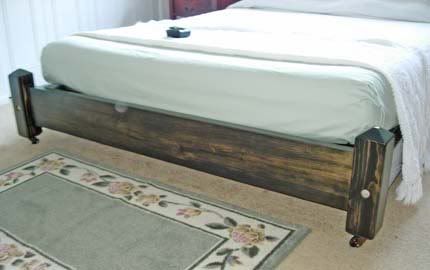 This is a platform bed I built just a little while ago for my Mother-in-law. She had just got a new queen mattress, and since her old bed was a double, needed a new frame.
She wanted the bed to be low, with no box spring, so we went with a platform design. She also wanted to be able to move it around without too much trouble, so, the casters.
To keep the cost low, I built it out of standard dimensional lumber. It has a headboard, footboard, side rails and a plywood platform with extra support feet in the middle.
I used the through-bolt system for the attachment points. Each side rail has a long threaded bolt centered in the end, and a wood dowl above and below it. The bolt enters the end post of the head and foot boards and is pulled tight with a washer and nut from the out side. In the pics you can see the hole for the nuts in the corner posts. I usually cover these with a brass rosette, but I forgot them when we took the bed up.
Around the inside of the headboard, footboard, and side rails is a 1x2 support strip for the edge of the platform to rest on. The platform is in two pieces, so that I didn't have to wrestle a queen size sheet of plywood up to the third floor.
A center support runs up the middle of the bottom of the platform, and four posts support it to ensure that there is no bowing.
The stain is minwax Ebony, with a finish of four coats of satin polyurethane. The weather was hot and sunny when I was finishing this bed, and I like to use the sun to "bake-on" each coat of finish.
I set up a pair of ladders in the back yard and ran plywood sheets through them so as to hold the pieces up facing south. I like to make sure the finish is thoroughly mixed and warm and thin before applying it. It also helps if the wood is warm as well. This gives you a nice even coat that doesn't harden too soon.
I also sand lightly between coats, the end product has a much smoother feel if you take the time to do it right.
A final hand rubbing with a sheet of corrugated cardboard, ripped into two sheets, gives you just enough abrasion to bring up a nice shine.
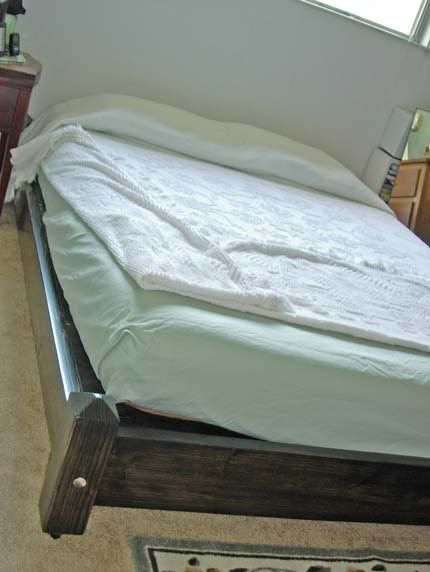 This bed will break down easily for transport with a ratchet and socket with an extension. In use, you will find that a bed put together like this, instead of the more common hook and eye type connection, is rock solid. This bed does not creak, wiggle or bow. If at any point in the future, wood shrinkage loosens the joints, a half-turn on the nuts will pull it up snug again.
Wednesday, April 15, 2009
The Wall Shelf Unit.
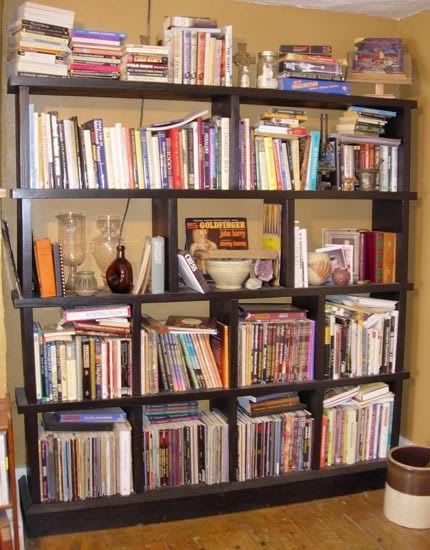 My lovely wife wanted a wall unit similar to a modular one that she saw in a Pottery Barn catalogue. I looked over the pottery barn design, and decided it could use some improvement.
Their unit consisted of stackable, H shaped pieces that could be set side-by-side to create a wider shelf.
It wasn't a bad design on the whole, but it had no base of any sort, and the pieces were just veneered particle board.
I hate particle board. It has no strength to speak of, absorbs any moisture it comes in contact with, and it weighs a lot more than an equal size piece of solid wood. You can't even safely compost it because of the glue and chemicals that hold it together. I suppose there must be some application that justifies the existence of particle board, but I don't know what that might be. Ballast, maybe.
The shelf unit pictured is made from 2x12 lumber that was edged and sanded for a cleaner look.
Instead of side by side and stacked units, I made each level a single unit. Side by side is never stable.
I built a separate base unit for the shelf units to stand on also. No part of the floors in this old house are completely flat. No part of the floors in 90% of new houses are flat either, but that's a different grumble.
Having a base unit gives better support for the upper units. It's much easier to shim and level a continuous foot, than it would be to do so for five floor touching uprights.
I set out the uprights to divide the shelf spaces in a pattern of four,four,three,two, one, from the floor to the ceiling. Visually, this puts the greatest mass of the piece lower to the ground and keeps it more open towards the ceiling. This looks nice, and it puts the maximum support on the bottom.
This is not a light weight piece of furniture. 2x12s are normally used for floor joists and such, but the idea was to make something with a feeling of solidity, and nothing can really simulate that impression. It takes mass. Mass survives.
This was my first attempt at a wall unit like this, and it's not quite as polished as I would have liked. I did learn a few things doing it though, and the next one will be sharper.
I put two coats of black satin on it, and then a poly finish, lightly sanding between coats. I didn't give it any contrasting high lights since it wasn't meant to appear like an old piece.
My to-do list includes building another similar unit for the other side of the chimney. I don't know when I'll have time to get to that. I've resigned myself to the fact that the to-do list will in fact, never be done. It grows like kudzu.
Sunday, March 8, 2009
A new set of Wine Crate End Tables.
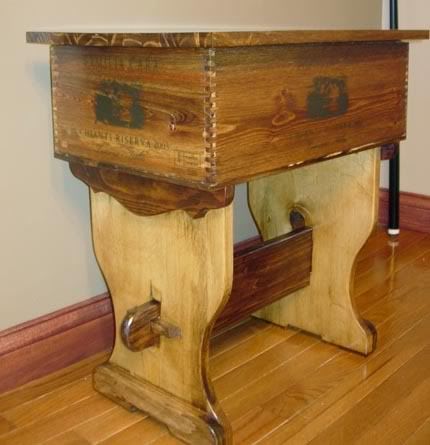 I just finished a new set of the wine crate tables and I'm pretty pleased with them. Again, I tried some new design ideas, and though I probably won't repeat them in exactly the same way the next time, I did learn some things.
These crates are from Familia Cara, they have an image of a nice Italian family dressed in clothes of around 1890 on the sides. It's an ink print instead of burned on, but it's mostly clear and looks nice. The crates have good finger joint corners, which always add visual interest and plenty of strength.
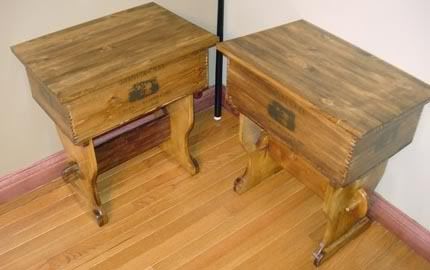 I've decided to start assigning stock numbers to each of the tables I build. No two of them is exactly the same as any other, and it will help to be certain about which piece we're talking about when I have to answer questions. So, above on the left is WCET10, and on the right is WCET11. That's straightforward enough.
The main differance between these two is that WCET10 has a narrower trestle bar than WCET11, and WCET11 uses rounded dowel pins through the tenons, while WCET10 has square ones. They are that way, because that's how the materials I had on hand were.
I don't have a pattern for the parts, I just freehand all the cuts. I have to say, though, that I'm thinking of making patterns of some of my favorite curves and shapes. Just to make things go faster when I'm not breaking new ground in my plans.
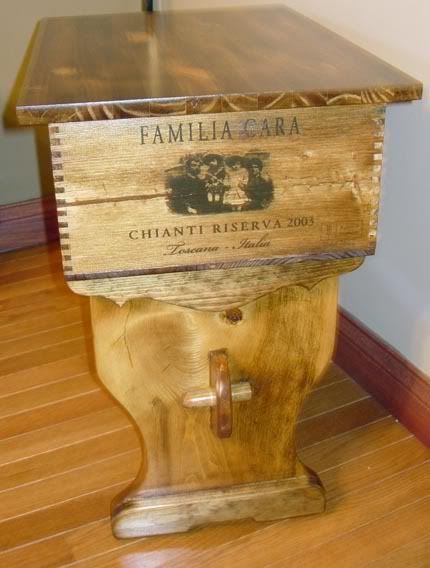
I really got lucky with finding the wood for the legs on these two tables. It's pine, and while it's new lumber, It's from a very large, old tree. The growth rings in the wood are very closely spaced, and very curly. Nothing like the run of the mill you usually find in a place like Menard's, which is where I got it. I spent half an hour rooting through the low quality planks and found it in the bottom of the pile. I suppose it was in there because it had a wainy spot on one side. That sort of thing is no disqualifier for me though, It just adds character to my way of thinking.
I restack all the planks I've gone through when I'm done, I've worked retail before and inconsiderate customers just add to the trials of that sort of work.
It did have a great deal of sap in it though, and I knew that would be a problem for the sanding and finishing, and it was. This much resin in the wood smells great, but once it heats up from sanding, it gums up paper faster than you can replace it. To get rid of as much of the resin on the surface as I could, I first rubbed the wood with acetone and scrapped it. It helped some, but the sanding still used up a lot of paper.
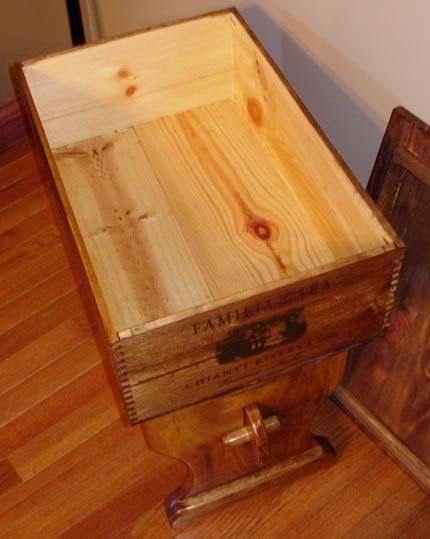 Here's a shot with the top off to show the inside of the table. I didn't stain the inside of the crates, but they did get a coat of satin polyurethane. The stain used on the outside is minwax provincial, a nice medium color. There are three coats of satin poly on the outside.
Instead of having cutouts for the feet, this time I added a second piece of wood to give it some extra weight and stability. I think with the next crate tables I will combine the two and have some sort of heavy foot and decorative cutouts.
I think the crate table design is evolving toward a "best combination of features" design. It will be something strong, comfortable in appearance, and with practical uses.
I will be very interested to see what it looks like.
I'm going to put this pair up on ebay to see what I can get for them. I'm also considering etsy, since it seems to be dedicated to handmade things only.
Monday, March 2, 2009
The Pallet Shelf.
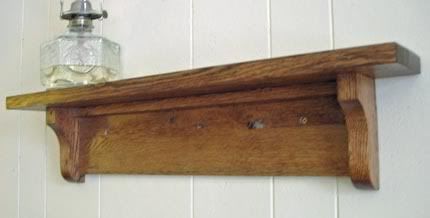
This is a simple little wall shelf. It has somewhat mission-like lines, square edges, simple corbels, a solid back. The only thing that's different about it is that it's made entirely of red oak from a shipping pallet. I think the pallet was from a shipment of auto parts dad ordered, or maybe his heat pump.
Anyway, lots of pallets are made of low grade red oak. It's durable, and the pallet can be in use for quite a while. Eventually though, they crack, or come apart and get thrown away. I don't know if anyone recycles pallets. They're put together with spiral nails shot by air guns and those are very difficult to get out. Especially with oak, it's tenacious about holding on to nails, once they've been driven in.
You would have to have equipment that could handle cutting through lots of metal, and then you'd probably only be able to make mulch with the remains. Unless you were willing to spend the time prying or cutting a pallet apart by hand for the salvageable parts, like me.
I can't help but at least try to do things the hard way. I'm not right.
After some planeing and sanding, the parts for the shelf looked quite nice. You never know what's hidden under the dirt and grit on an old piece of oak. Most of the pallet just wasn't salvageable, too many splits and knots, but enough was solid for a small project. The rest of it fed the wood stove in the shop.
You never know though, when a piece of material that looks usable only for heating, may have a hidden beauty underneath the grime. Here's to diamonds in the rough.
Subscribe to:
Posts (Atom)

 Posts
Posts


