Friday, August 1, 2014

Small Salvaged Oak Coffee Table Craftsman/Rustic

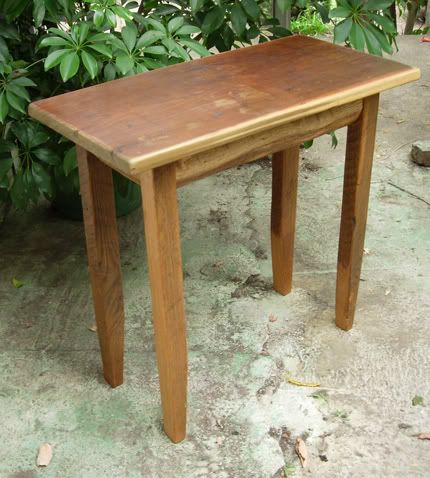
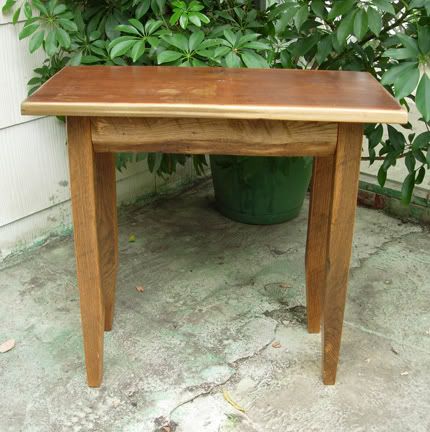
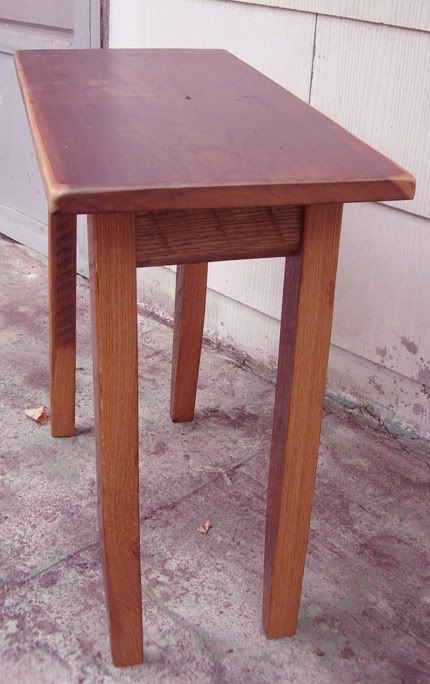
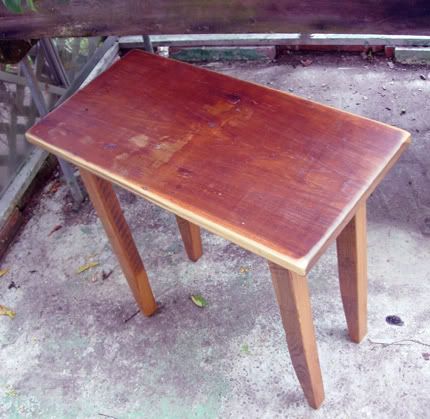
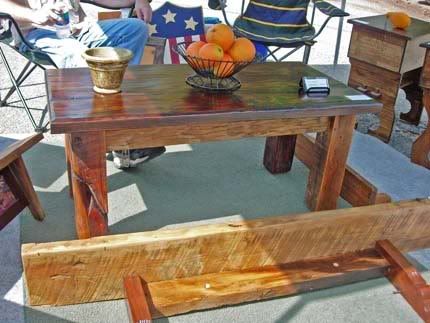
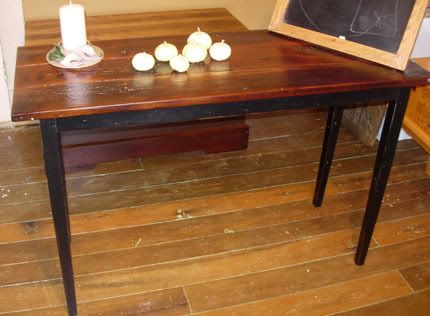
 This is a small coffee table I just finished. Its all of salvaged oak, red and white, mostly from shipping crates.
Its 19.5" wide, 36" long, and 18" tall. The top is about 3/4" thick, the legs 2x4 or so, and the apron about 1-1/4" thick.

It takes some work, getting those despicable spiral shank nails out of oak, but I think its worth it to get materials that are as visually and tactilely interesting as this.  Also, buying clear oak in any quantity is really, really expensive.

You can see the leg closest to the camera in the above photo has some extensive boring insect damage. I made sure that it faced out so it could be seen.

Its quite heavy for its size. But I think it would work in small spaces very well.
It should probably be a well lit space. If you run into this in the dark, it won't give ground.

 I used the rainwater and black walnut husk juice stain that I've used on several previous pieces. This time its a bit darker and browner though, because the juice had time to ferment over the winter. Fresh green walnut husks have a smell that I just love. I'd wear it as a cologne if anyone made it.

The fermented juice has a smell like old pipe tobacco, plus a deep forest must sort of scent. I think it's pleasant, but it doesn't linger after the stain drys.

                                                                     SpareKitty assists.

Each of the apron sections has a natural wain that I turned down towards the ground. They give all sides of the table a distinct appearance. Above, the apron is much deeper on the end touching the left leg than it is on the end touching the right leg. It's a live edge on the downface and the sweeping curve draws the eye.


Friday, October 4, 2013

The Bullet Stool.

 Here's one piece I won't be able to replicate. This is a black locust and cedar stool that's just a bit under bar stool height, (24"). The seat plate is a section I cut from a large locust that stood along one side of the driveway.
The tree had been dead standing for years. It's had to know how long, because black locust is nearly indestructible. There are logs that I know have been laying on the ground for thirty years out in the woods that haven't even begun to rot. The bark comes off but the wood just gets darker.
Anyway, I cut it for firewood last winter, and I thought I'd save some of it for stools. On the third pass through the log, I saw a bright spot of shiny silver metal in the wood.
 I began cursing.
I thought I'd cut through a piece of old fence or rod that the tree had grown around. That ruins chainsaw chains and they aren't cheap if you use the good ones.
It didn't make sense though. The section I cut through was at least 15' from the ground when the tree was standing. So it wasn't likely to have been a fence.

 I gave the metal a press with my thumbnail and it dented easily. It wasn't iron, it was lead. I had cut through a bullet that had been in that tree for who knows how long. What are the chances of cutting through a forty foot log at exactly the right spot to hit a bullet embedded in the wood?

The photo right above shows the bullet in the stool seat. It looks like maybe a .38 or so.

The seat I rubbed with walnut husk, cause I like it. The legs I left natural cedar. Three coats of finish after. The locust was very old and dry. It sucked up a lot of urethane.

Red and White Salvaged Oak Coffee Table.

 This coffee table is made completely from oak I salvaged from shipping crates. It's good stuff with a lot of character. It's got knots and nail holes and saw marks and dings and cracks and all sorts of visually interesting points.

 The legs came from crates constructed to hold farm implements in shipping. Plows, rotatory tillers, that sort of thing. None of this was finish cut, so its full thickness. The planks that make up the top are an inch thick.

The table measures 24" by 48", and 18" tall. Also, it weights a frick'en ton.  I didn't think about how much this amount of oak would weigh once it was all screwed and glued together. You don't want to run into this thing on your way to the bathroom in the middle of the night.

 Here you can see the rays in the white oak leg. You only get this sort of pattern if the wood is cut at the right angle. Cutting wood for shipping crates doesn't result in this on purpose. Here it's just a happy accident. Originally, of course, this was rough cut and the pattern wasn't obvious if you didn't know to look for it.

I ground down the unevenness and marks from the saw teeth with an angle grinder. You could run it through a power planer and make it perfectly flat if you wanted that. I don't want that. Dead flat surfaces and perfect angles don't keep your eye. I'll make tight joints for strength and durability, but I want a hand made item to look hand made.
 There is no commercial stain on this table. All the color comes from the juice of green husks of Black Walnuts. I have the fingers to prove it. I really haven't found a commercial stain that compares to walnut juice for depth of color. It penetrates into the wood, and depending upon the species, brings up a gold to near black that just draws the eye.

Here's the table drying in the sun after the final finish coat. I'll usually put on three coats of finish. Allowing it to dry between coats and then sanding each one to get that glassy surface that still allows you to feel the wood grain. The oak, especially the white, however, is so hard that it doesn't pull in much finish. Because of this, I only used two coats on the table.
I'm not completely done with this one yet. I have to take a hair off two of the legs and then put low profile feet on all four of them. All the legs are exactly the same length, but because the top is not dead flat, but has high and low areas, I'll have to adjust for them.

Walnut and Cedar short stool.

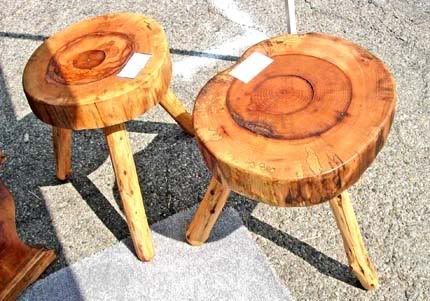
 New stuff!  Walnut top with cedar legs on this chair height stool. No stain on this one. Only satin polyurethane, (two coats), as a finish.

The top picture was taken outdoors, in shade. The bottom in direct sunlight.
The seat is about 18" from the ground. Standard chair seat height, give or take.

I'm going to do several sets of stools for my wife to take to the craft fairs. The drought of the last couple years seems to have killed most of the small cedars out in the woods, so I have lots of material for the legs. The larger cedars, especially the ones that I pruned up the trunk, seem to be surviving alright. They do have some indications of stress however, so I'm going to keep an eye on them.

Friday, September 24, 2010

Ash & Oak stools and coloring wood with walnut husks


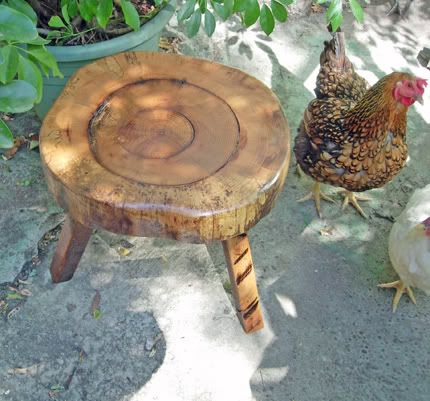
This is one of a pair of ash and white oak stools I did for the 2010 Monrovia fair. I had a bad feeling about the fair before hand and it proved to be so. It was a washout for me. So, I gave this stool to my brother for his birthday.
The top is a plate of ash from the same log I did the last set of stools from. I'll probably be able to get a few dozen stools out of it before I'm done. The legs are ripped from a roughsawn white oak 2x4 I salvaged. I only roughly smoothed and shaped them, leaving the major saw marks and signs of wear in place.
Ms Jaunty Beret, one of our gold wyandotte hens, came to supervise my photo session.

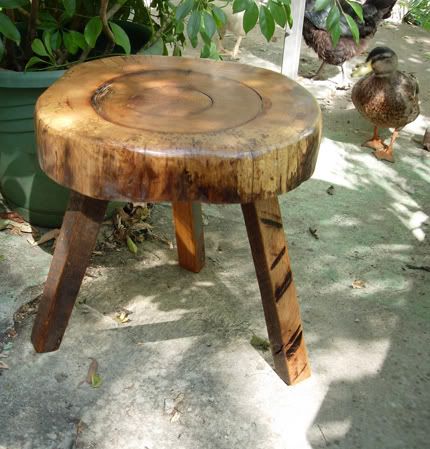
After Ms Jaunty Beret realized I had nothing to eat and left, her place was taken by Quaker Jack the mallard.
This is the same stool from a lower angle to show the legs a bit better. This stool has no stain, but several coats of spar urethane.

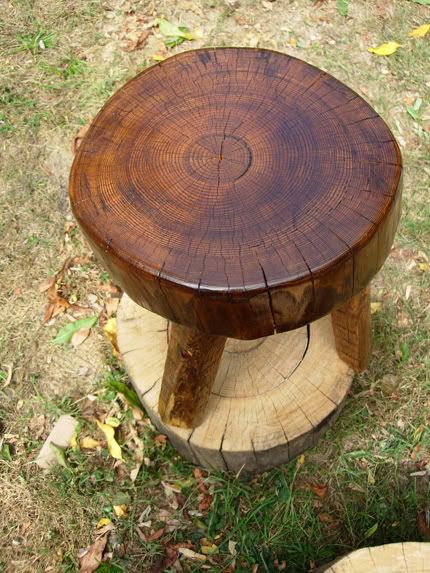
This stool is the one I thought would be interesting to rustic minded readers.

The stool is just like the one above, ash and oak, with a couple differances.
The legs are red oak instead of white. I cut them from an 8' 3x3 I found behind a dumpster in town. Probably from a shipping crate of some sort.

It's about an inch and a half taller than the stool at the top of the post, 18" surface height. This the most common height for dinning chairs.

The most interesting thing is the color though. I used no commercial stain on this stool. Instead I rubbed it directly with the green husks of black walnuts. The juice of the husks produce a powerful stain, and I've tried before to make a liquid stain from them, with limited success. This time I just twisted the husks off the nut and rubbed the juice into the wood by hand.

For the picture, I place the stool on top of a another section of ash from the same log, to show the difference in color between the unstained wood and the husk colored.

At first the stain colored the wood a yellow-green that wasn't so appealing. But I left the stool in the sun for a couple of days and it gradually changed into a very rich nut brown with gold high lights. I'm very pleased with the results.

I'm going to go collect enough walnuts for a big piece now. I'm thinking of a kitchen table. I'm still going to try and render or tincture the husks into a liquid base, but I have the feeling that I just won't get the deep color that hand rubbing with the husks has provided.

Thursday, September 2, 2010

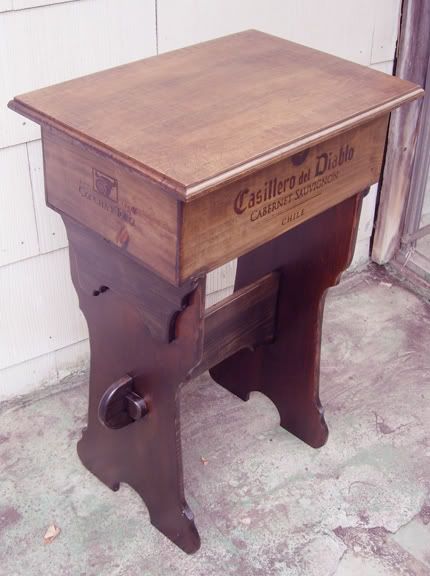
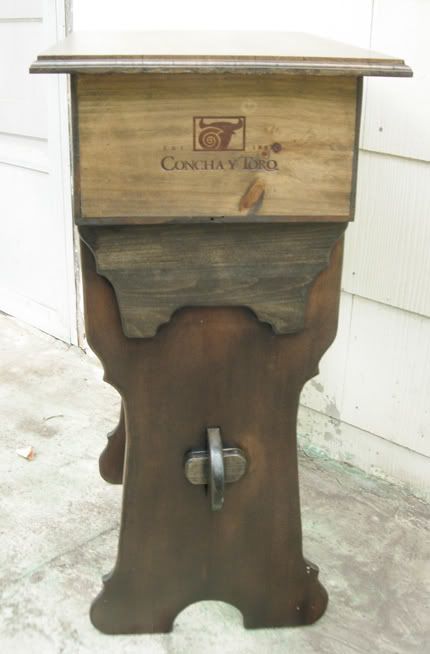
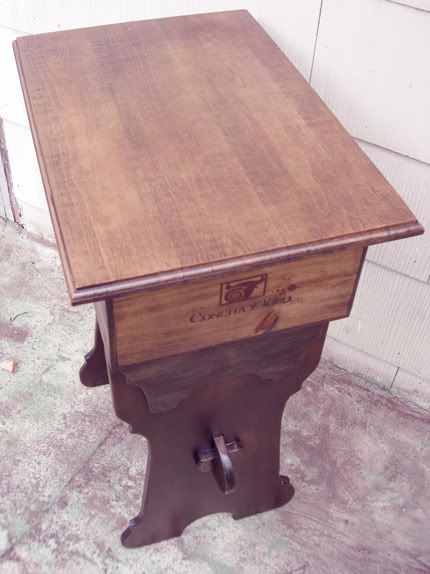
A somewhat gothic wine crate lamp table.


16" wide x 24" long x 34" tall. A lamp table is taller than an end table as it is meant to stand behind or beside a reading chair. It keeps the lamp higher than an end table to shed good reading light down on the book.
They also make good door side tables or entry way tables. You can put a basket or tray on an entry table to keep keys or serve as a catch all.
None of the three photos here quite have the correct color and tone of the actual table. The top and bottom are too light, and the middle is too dark. I used an old can of ebony stain that had solidified, and though I thinned it back to liquid, the change alters the texture and color of the stain.
I like it though. It's much darker than I usually go with, but I think it fits the shape of the trestle legs quite well.

The top is made from an old and scarred maple cutting board. It took a lot of hand scraping with a broad chisel to remove the top layer of surface wood. I didn't want to plane it as I didn't intend to remove all the years of knife scars from it.
I went ahead and routed the edge to dress it up a bit. Maple really works cleanly, the routing is very sharp and defined.
I usually use old pine, poplar or oak for tops and they're much less apt to take a clean edge without a few extra passes.
This is the only crate I had for Cassilero Del Diablo, a Cabernet from Chile. Its shallower than most of the other crates I've collected and gives the table a less top heavy profile. In these pics is looks a bit leg heavy to me, but it doesn't appear so in person. A matter of perspective I suppose.

Wednesday, August 25, 2010

Poplar plank leg table.


The top of this little table is a single piece of tulip poplar that once was a closet shelf in my grandmother's house. The plank was much older than the closet, which was an add-on to a room that was originally built without closets. The underside of the shelf was black with that soft, almost crumbly texture that poplar gets after 90 or so years undisturbed in the dark.

The legs are white oak. I ripped them down from a 2x4 salvaged from a friend's barn. Guess what an 8' white oak 2x4 costs today. You won't be doing any balloon framing with them, I can tell you.
The apron sections that join the legs are also white oak. I don't recall where I got the original piece from. It had a severe wain, the curve in the surface from cutting the plank from the edge of a log. Most of the time wainy lumber gets trashed or ground up for secondary uses, or used as stickers in shipping, but I thought It would look good as an apron with the wain turned down. And it does.


I took some of the bottom six inches of the legs off to make a slight inside taper. This tends to give the table a more visually pleasing look to the feet, and it also makes it stand more firmly. The less actual area of the foot touching the ground, the less likely it is to have any wobble.

The table is 24" tall by 25" long and 12.5" wide. I gave the top a couple of coats of satin polyurethane but no stain. The wood already had so much color and character that stain would have been over kill.
The legs and the apron I gave a single coat of danish oil, and once that dried, one coat of satin poly over that.

I did all cutting, sanding,and assembly on this table in about four hours. Not having to glue up a top or do any mortising for a trestle base made this very fast.
The finishing took a couple days, mostly just in the waiting for the coats to dry really.
The thing is, this is a table that is solid, functional, and richly characterful. It will be useful long after I'm gone, and it took negligable time and effort,(from my point of view). It recycles and reuses materials from before I was born and gives them a second life. I can't imagine why people go to Walmart and trade their money for slabs of particle board faced with plastic wood grain photos when this is possible. When you give money, the earning of which cost you time out of your life which you can never get back, for any shoddy cookie cutter product, you're actually destroying that little bit of wealth. Nobody is ever going to treasure as a family heirloom the $49.99 flatpacked coffee table you got at target.

Friday, June 11, 2010

A poem apropos for the 21st century.

The Purse-seine, by Robinson Jeffers, 1937

.......I cannot tell you
How beautiful the scene is, and a little terrible,
then, when the crowded fish
Know they are caught, and wildly beat from one wall
to the other of their closing destiny the
phosphorescent
Water to a pool of flame, each beautiful slender body
sheeted with flame, like a live rocket
A comet's tail wake of clear yellow flame; while outside
the narrowing
Floats and cordage of the net great sea-lions come up
to watch, sighing in the dark; the vast walls
of night
Stand erect to the stars.

Lately I was looking from a night mountain-top
On a wide city, the colored splendor, galaxies of light:
how could I help but recall the seine-net
Gathering the luminous fish? I cannot tell you how
beautiful the city appeared, and a little terrible.
I thought, We have geared the machines and locked all together
into inter-dependence; we have built the great cities; now
There is no escape. We have gathered vast populations incapable
of free survival, insulated
From the strong earth, each person in himself helpless, on all
dependent. The circle is closed, and the net
Is being hauled in.......

Tuesday, February 2, 2010

Dynamite Crate Lamp Table.

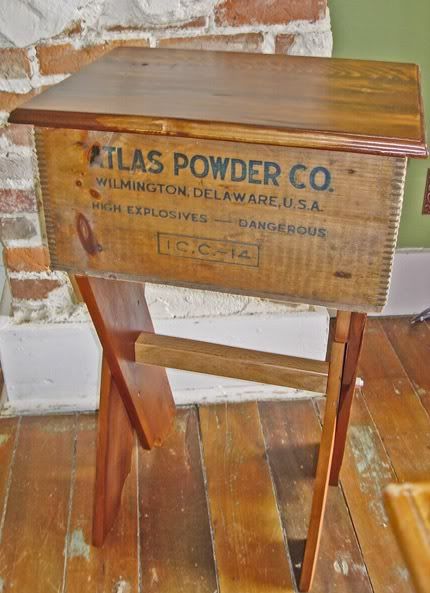
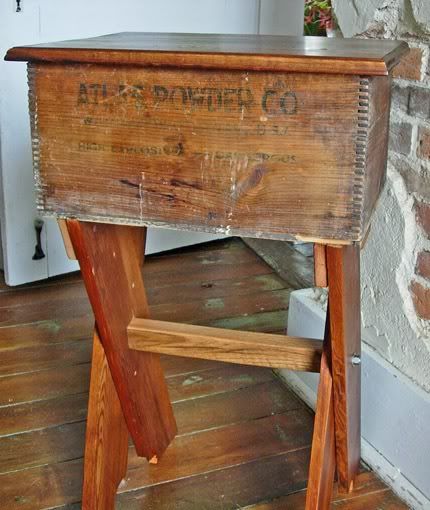
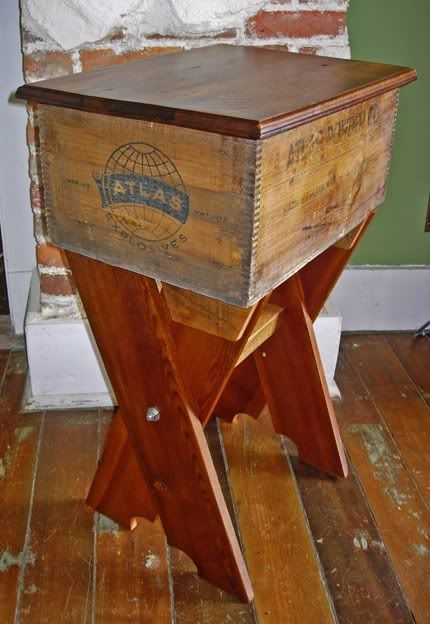
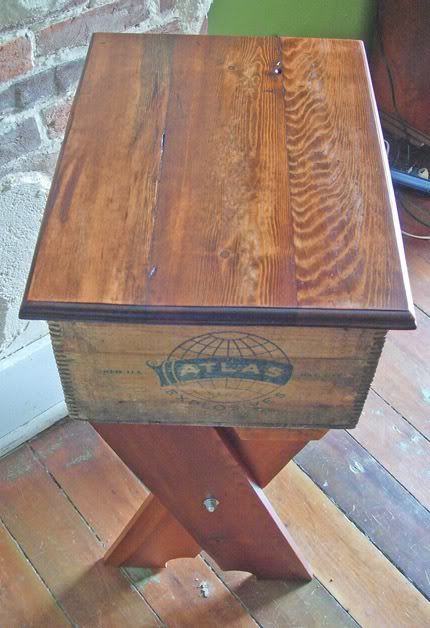
Dad found me this old Atlas Powder Company crate at a flea market a while ago. I knew I'd make a table out of it, similar to the Wine Crate end tables I've been doing.
I finally settled on a scissor leg design, with a trestle bar.
I wanted this to look both somewhat rustic, and a bit industrial at the same time. I was going for a look that felt as though it might have been assembled out of available materials at an exploratory mining encampment some time in the past.
To support that theme, I went with exposed nuts and washers on the outside of the cross legs, instead of the mortise and tenon joint I used with the wine crate tables. Since the legs overlap each other, I couldn't use the single broad cleat to hold the legs to the bottom of the crate. Instead, I made a pair of chevron shaped cleats for each end and attached them so that one would be seen from the outside, and the other would be hidden by a leg.


All the parts of the lamp table are salvaged material. The top and legs are made from very old pine planks from a set of shelving my grandmother used to hold homemade jelly and preserves in her basement. The growth rings in these boards are so tight and so numerous, that I can't count them. I suppose I could with a magnifying glass and a stylus, but it would take a while.
You just can't find wood like this now a days. Rings like this indicate a very slow growing and very old tree. We largely wasted the old growth forests of north America on frivolous crap that chokes the land fills now. But I suppose that's a rant for another day.
I gave the top a coat of Minwax Provencal stain, a medium dark and my personal favorite. I them sanded most of it off after it had dried. I purposely took off more stain in some areas than in others, to increase the variation in the appearance of the top.
I really prefer the hand made look to furniture, and most other things really. I like it to the point of leaving dings, scratches and other damage in old materials so that they are obvious in the furniture I make from them.
I sold high end furniture for a long time, and I eventually realized I didn't much care for it. I think it's a problem that our culture of mass manufacture has made people intolerant of imperfection, and unable to appreciate the individual character of things that are made one at a time.
Mass production makes items available to greater numbers of people at a reduced cost, but it also reduces the value of the items produced. Nobody cares about the coffee table they got at Target, there's a million others just like it getting chucked in dumpsters when their badly designed joints give out.
Sorry, ranting again. Heh...
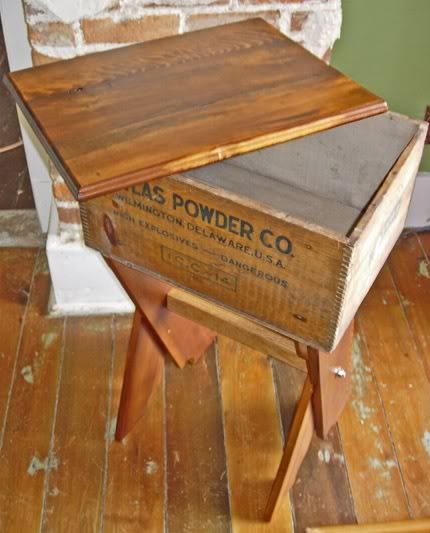
Anyway, I gave the top a few brushed coats of satin polyurethane, so that it would wear better. The powder box itself, I only gave a single thin sprayed coat. I wanted it to retain all of it's worn and faded appeal and remain distinct from the top and legs. The legs got two brushed coats as well.

As with the wine crate tables, the top comes off so that the crate is available for storage.

The end of the crate is marked with "50, 4x16, Atlas Apex C, 15, 516, H.V.", I know the 5o means 50 lbs, and I assume the 4x16 refers to the size of the sticks of explosive the crate contained.
I haven't been able to find an identical crate online. Atlas made explosives for a variety of applications, but most of the crates I've seen were for coal mining explosives like Coalite. I know they ceased operations in the 60's, but from the condition of the crate, I believe it at least dates from the 40's.
If anyone can identify the age of the crate more accurately, I would appreciate hearing from you.


Wednesday, September 16, 2009

The Monrovia Festival, 2009

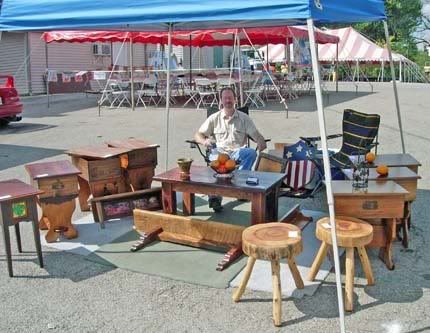
I got a little booth at the Monrovia Festival this year. Above is a pic of me and my display. I wasn't really sure that what I have to offer would go over well. A town festival isn't usually the sort of venue that people go to to look for furniture. Especially my own sort of one-off designs.

The whole thing turned out much better than I expected, however. I sold several pieces when I was really just hopeful for a couple of sales. I had to print more business cards as we went through what we had the first day.

The attendance was much larger than I expected, or remembered from previous years. I'm getting the feeling that people are choosing to attend smaller, local events like the Monrovia Festival, rather than drive farther, and spend more money at larger, events, or on travel and vacations. It seems that the failing economy is likely to force a re-invigoration of local economies and small scale crafts, as world-spanning businesses and supply chains become less viable.
This suites me just fine.
I also think that when people choose to spend their money, they will more and more pick items which are of higher quality, are unique, and will hold their value. I may just be projecting my wishes on the world here, but, I think, in an economy that is reality-based, and not a castle-in-the-sky of financial fantasy, long lasting items with character will have an edge over the mass-produced non-working replicas of real products which fill the bigboxes now.

Here is a coffee table and mantle shelf I brought to the Festival. Both are from salvaged materials.
The coffee table is poplar,(top and apron), cedar and ash,(legs). Legs are an interesting find. They were cut from 4x4 beams that served as floor joists in a little barn that was torn down, and then dumped at the home of a friend of mine. He was just going to use the wood in a bonfire for a party, but he let me rummage through it first, knowing I love to salvage useful things, and I pulled out four beams. Three cedar and one ash.
the ash is pale and pretty straight, but the cedar is wainy and had lots of old checking and fractures. As soon as I cut it, it filled the shop with the scent of cedar oil, even though it's who knows how old.

The Mantle Shelf is white oak, and walnut, also an interesting story. The shelf itself was once part of a door frame in my basement, easily cut 160 years ago. I had to pull out the frame last fall to get the new furnace in. We also had to widen the opening in the wall, so the old frame couldn't go back.

In the pic, you can see the shallow curve of the saw blade that cut the plank in the first place. When I get some thing that proves the age and character of a piece of wood, I never take all of it off in the refinishing process. I love that sort of thing.

On the right end of the shelf, which you can't see in the picture, there is a large iron spike that was driven in to the door frame at some time. I don't know what for, but it looks great, and it's nearly impossible to get something like that out of old oak, so I left it in.

The corbels that support the shelf are walnut, and pieces I salvaged from the remains of a very old player piano. Just how old that piano was, I don't know, but most of it had collapsed into dust when I took it apart.


Here is a pair of tables/stools made of ash and cedar. Ash tops and cedar legs. The ash is from a downed tree back in the woods. It came down three years ago, and I'm pretty sure the ash borers are to blame for it's death. I'm seeing quite a few dying ash trees on the property now.

A log of that size, parts of it are more than two feet in diameter, needs a few years to dry out enough to be stable for furniture building. There was still some checking that appeared after I cut some plates for the tops, but I doubt it will cause any problems down the line.
The legs are from a standing dead cedar that was near by. It had been out competed for sunlight under the forest canopy and was already nice and dry. Also, the cedar oil is a great rot inhibitor.
I used an antique draw knife belonging to a friend to shave the legs down to a diameter for the tenons that plug into the mortises in the undersides of the plates. I had to use my clamping table to hold the legs while I shaved them, and it was a pain in the neck. Building a proper shaving horse for the shop is definitely on my too-do list now.

Friday, August 28, 2009

Platform bed on casters.

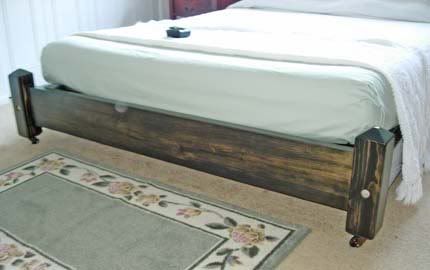
This is a platform bed I built just a little while ago for my Mother-in-law. She had just got a new queen mattress, and since her old bed was a double, needed a new frame.

She wanted the bed to be low, with no box spring, so we went with a platform design. She also wanted to be able to move it around without too much trouble, so, the casters.

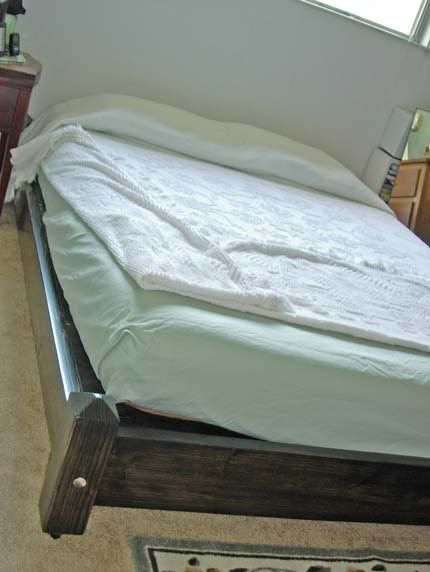
To keep the cost low, I built it out of standard dimensional lumber. It has a headboard, footboard, side rails and a plywood platform with extra support feet in the middle.

I used the through-bolt system for the attachment points. Each side rail has a long threaded bolt centered in the end, and a wood dowl above and below it. The bolt enters the end post of the head and foot boards and is pulled tight with a washer and nut from the out side. In the pics you can see the hole for the nuts in the corner posts. I usually cover these with a brass rosette, but I forgot them when we took the bed up.

Around the inside of the headboard, footboard, and side rails is a 1x2 support strip for the edge of the platform to rest on. The platform is in two pieces, so that I didn't have to wrestle a queen size sheet of plywood up to the third floor.

A center support runs up the middle of the bottom of the platform, and four posts support it to ensure that there is no bowing.

The stain is minwax Ebony, with a finish of four coats of satin polyurethane. The weather was hot and sunny when I was finishing this bed, and I like to use the sun to "bake-on" each coat of finish.
I set up a pair of ladders in the back yard and ran plywood sheets through them so as to hold the pieces up facing south. I like to make sure the finish is thoroughly mixed and warm and thin before applying it. It also helps if the wood is warm as well. This gives you a nice even coat that doesn't harden too soon.
I also sand lightly between coats, the end product has a much smoother feel if you take the time to do it right.
A final hand rubbing with a sheet of corrugated cardboard, ripped into two sheets, gives you just enough abrasion to bring up a nice shine.

This bed will break down easily for transport with a ratchet and socket with an extension. In use, you will find that a bed put together like this, instead of the more common hook and eye type connection, is rock solid. This bed does not creak, wiggle or bow. If at any point in the future, wood shrinkage loosens the joints, a half-turn on the nuts will pull it up snug again.


Wednesday, April 15, 2009

The Wall Shelf Unit.

My lovely wife wanted a wall unit similar to a modular one that she saw in a Pottery Barn catalogue. I looked over the pottery barn design, and decided it could use some improvement.

Their unit consisted of stackable, H shaped pieces that could be set side-by-side to create a wider shelf.
It wasn't a bad design on the whole, but it had no base of any sort, and the pieces were just veneered particle board.
I hate particle board. It has no strength to speak of, absorbs any moisture it comes in contact with, and it weighs a lot more than an equal size piece of solid wood. You can't even safely compost it because of the glue and chemicals that hold it together. I suppose there must be some application that justifies the existence of particle board, but I don't know what that might be. Ballast, maybe.

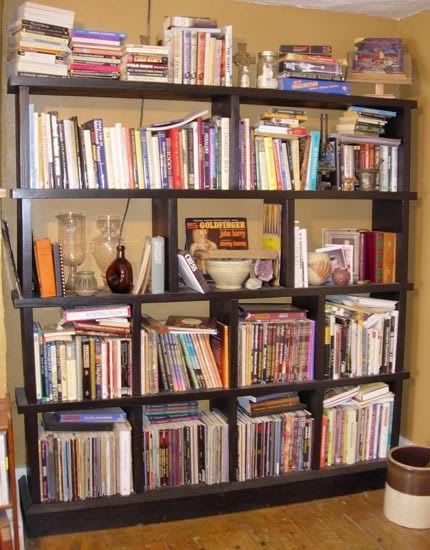
The shelf unit pictured is made from 2x12 lumber that was edged and sanded for a cleaner look.
Instead of side by side and stacked units, I made each level a single unit. Side by side is never stable.

I built a separate base unit for the shelf units to stand on also. No part of the floors in this old house are completely flat. No part of the floors in 90% of new houses are flat either, but that's a different grumble.

Having a base unit gives better support for the upper units. It's much easier to shim and level a continuous foot, than it would be to do so for five floor touching uprights.
I set out the uprights to divide the shelf spaces in a pattern of four,four,three,two, one, from the floor to the ceiling. Visually, this puts the greatest mass of the piece lower to the ground and keeps it more open towards the ceiling. This looks nice, and it puts the maximum support on the bottom.

This is not a light weight piece of furniture. 2x12s are normally used for floor joists and such, but the idea was to make something with a feeling of solidity, and nothing can really simulate that impression. It takes mass. Mass survives.

This was my first attempt at a wall unit like this, and it's not quite as polished as I would have liked. I did learn a few things doing it though, and the next one will be sharper.

I put two coats of black satin on it, and then a poly finish, lightly sanding between coats. I didn't give it any contrasting high lights since it wasn't meant to appear like an old piece.

My to-do list includes building another similar unit for the other side of the chimney. I don't know when I'll have time to get to that. I've resigned myself to the fact that the to-do list will in fact, never be done. It grows like kudzu.

Sunday, March 8, 2009

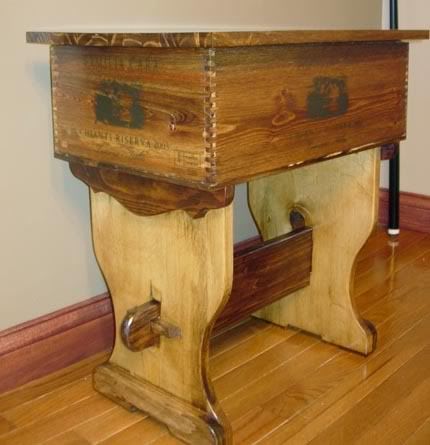
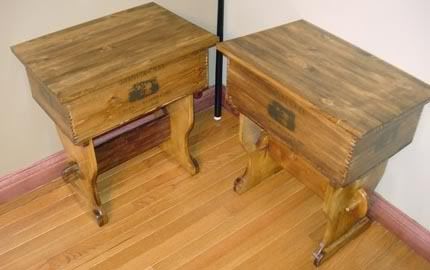
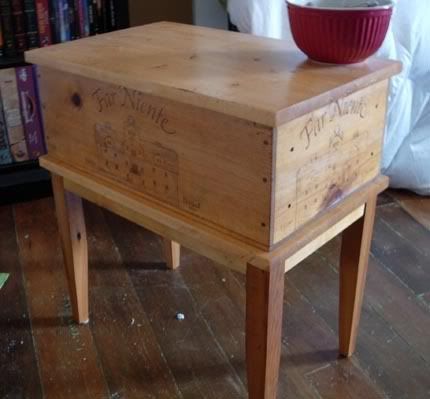
A new set of Wine Crate End Tables.

I just finished a new set of the wine crate tables and I'm pretty pleased with them. Again, I tried some new design ideas, and though I probably won't repeat them in exactly the same way the next time, I did learn some things.
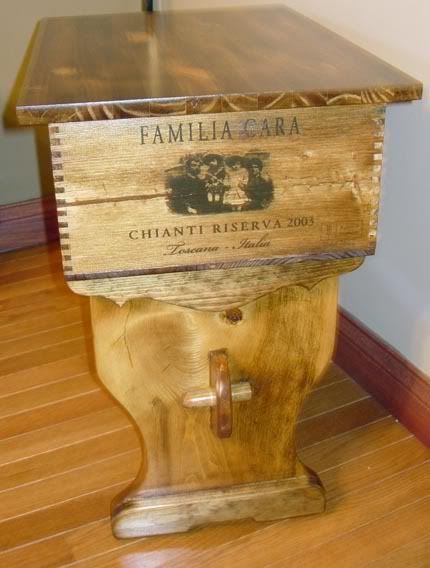
These crates are from Familia Cara, they have an image of a nice Italian family dressed in clothes of around 1890 on the sides. It's an ink print instead of burned on, but it's mostly clear and looks nice. The crates have good finger joint corners, which always add visual interest and plenty of strength.


I've decided to start assigning stock numbers to each of the tables I build. No two of them is exactly the same as any other, and it will help to be certain about which piece we're talking about when I have to answer questions. So, above on the left is WCET10, and on the right is WCET11. That's straightforward enough.
The main differance between these two is that WCET10 has a narrower trestle bar than WCET11, and WCET11 uses rounded dowel pins through the tenons, while WCET10 has square ones. They are that way, because that's how the materials I had on hand were.
I don't have a pattern for the parts, I just freehand all the cuts. I have to say, though, that I'm thinking of making patterns of some of my favorite curves and shapes. Just to make things go faster when I'm not breaking new ground in my plans.


I really got lucky with finding the wood for the legs on these two tables. It's pine, and while it's new lumber, It's from a very large, old tree. The growth rings in the wood are very closely spaced, and very curly. Nothing like the run of the mill you usually find in a place like Menard's, which is where I got it. I spent half an hour rooting through the low quality planks and found it in the bottom of the pile. I suppose it was in there because it had a wainy spot on one side. That sort of thing is no disqualifier for me though, It just adds character to my way of thinking.
I restack all the planks I've gone through when I'm done, I've worked retail before and inconsiderate customers just add to the trials of that sort of work.
It did have a great deal of sap in it though, and I knew that would be a problem for the sanding and finishing, and it was. This much resin in the wood smells great, but once it heats up from sanding, it gums up paper faster than you can replace it. To get rid of as much of the resin on the surface as I could, I first rubbed the wood with acetone and scrapped it. It helped some, but the sanding still used up a lot of paper.

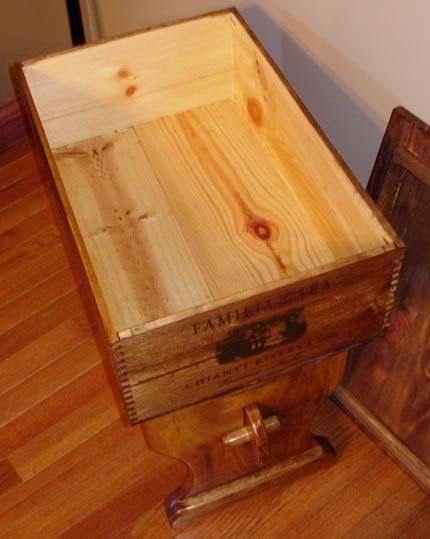
Here's a shot with the top off to show the inside of the table. I didn't stain the inside of the crates, but they did get a coat of satin polyurethane. The stain used on the outside is minwax provincial, a nice medium color. There are three coats of satin poly on the outside.
Instead of having cutouts for the feet, this time I added a second piece of wood to give it some extra weight and stability. I think with the next crate tables I will combine the two and have some sort of heavy foot and decorative cutouts.
I think the crate table design is evolving toward a "best combination of features" design. It will be something strong, comfortable in appearance, and with practical uses.
I will be very interested to see what it looks like.
I'm going to put this pair up on ebay to see what I can get for them. I'm also considering etsy, since it seems to be dedicated to handmade things only.


Monday, March 2, 2009

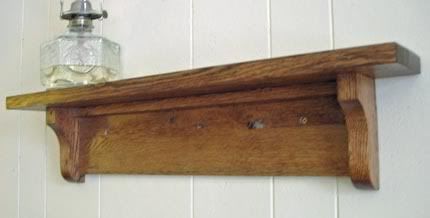
The Pallet Shelf.


This is a simple little wall shelf. It has somewhat mission-like lines, square edges, simple corbels, a solid back. The only thing that's different about it is that it's made entirely of red oak from a shipping pallet. I think the pallet was from a shipment of auto parts dad ordered, or maybe his heat pump.
Anyway, lots of pallets are made of low grade red oak. It's durable, and the pallet can be in use for quite a while. Eventually though, they crack, or come apart and get thrown away. I don't know if anyone recycles pallets. They're put together with spiral nails shot by air guns and those are very difficult to get out. Especially with oak, it's tenacious about holding on to nails, once they've been driven in.
You would have to have equipment that could handle cutting through lots of metal, and then you'd probably only be able to make mulch with the remains. Unless you were willing to spend the time prying or cutting a pallet apart by hand for the salvageable parts, like me.
I can't help but at least try to do things the hard way. I'm not right.
After some planeing and sanding, the parts for the shelf looked quite nice. You never know what's hidden under the dirt and grit on an old piece of oak. Most of the pallet just wasn't salvageable, too many splits and knots, but enough was solid for a small project. The rest of it fed the wood stove in the shop.
You never know though, when a piece of material that looks usable only for heating, may have a hidden beauty underneath the grime. Here's to diamonds in the rough.

Tuesday, February 24, 2009

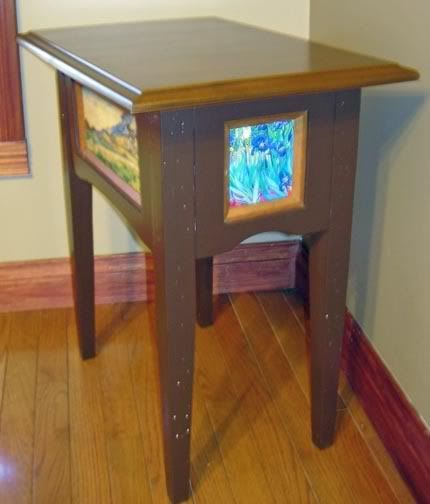
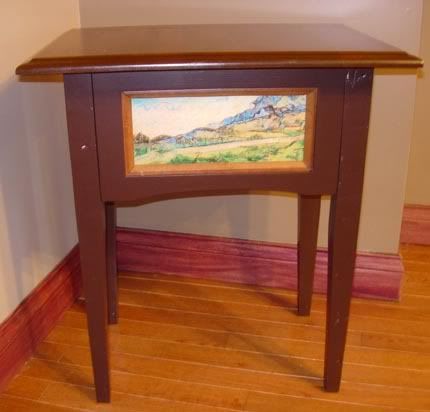
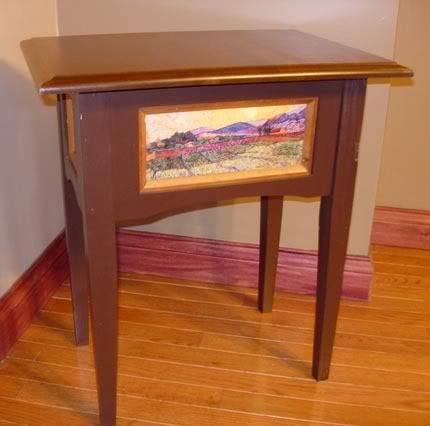
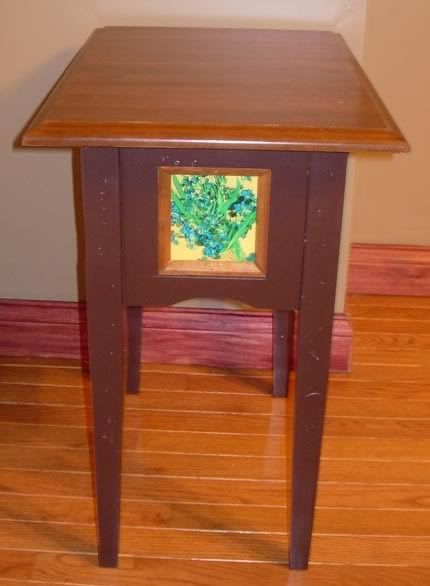
The Van Gogh end table

This is a little end table that was fun to build, or at least interesting, which is the same thing to me. I learned a few things that will be applied to future builds and I think I'd like to use this same general idea on a lot of other projects. A library table comes to mind. Maybe one with scenes from famous books inset in the apron wrapping around the underside.

The top of this table is actually a sample raised panel that my mom picked up at a yard sale. It's beech, a tight grained wood that is often used as a substitute for cherry.
The picture frame aprons are pine, just stock 1x2 material. I picked it out for it's straight grain and clean look. The images themselves are all paintings by Van Gogh, clipped to size in photoshop, and printed on heat transfer sheets. The sheets are then ironed on to 1/4 inch plywood backs that are inset in the backs of the frame aprons like a picture would be. I ran a chamfered edge moulding around the inside of the frames and stained it to bring out a contrast with the paintings. I had to make the moulding since I didn't have anything on hand that would fit, that was tedious.

The legs are pencil posts with a sharper inner angle. They are again reclaimed fir 2x4s with many nail holes and chips. The top is stained, but I painted the legs and aprons with a dark brown called "expresso". It's a great color, but I won't use that company's paint again because it was a terrible pain to get spread on evenly. It took four coats before I was satisfied.
The legs bolt on and come off easily. This time I used wing nuts, so no wrench is needed.


I've come to really like Van Gogh. I didn't care for expressionism when I was younger. Everything is expressionist in the morning before you find your glasses, and I couldn't see what was all that great about that. I have nice scans of some of his lesser known works now, and I'd like to use them in something. I just don't know if my wife will like the skeleton smoking a cigarette, or the earless self portrait.


Saturday, February 21, 2009

Wine crate end table with legs.

This is the first wine crate end table that I built. I did this one with four tapered pencil post legs before I decided the renaissance trestle style worked better for the wine crates.
The legs are reclaimed fir, sawed down from old 2x4s with nail holes and oxidation stains left in, I like them better that way.
The stain is very light, Minwax Ipswitch pine. It hardly darkened the wood at all. I tend to like darker stains, but I thought I'd give this one a try. The table was meant for a room with a dark wood floor and brown walls and I figured a light colored piece of furniture would help brighten the room.

The legs on this table bolt on and are removable. The pieces of the apron are screwed and glued to the plate that the crate sits on. a corner brace connects with each part of the apron and a threaded bolt pulls the leg tightly into a triangle formed from the aprons and the brace.

I learned this design for attaching legs when I was working for an Amish furniture dealer. The Amish used this design on all the leg tables they made, from end tables to twenty seat dining tables and I think it's the strongest leg joint you can have. A little piece like the wine crate end only needs a single bolt in the corner, but bigger legs use two or three.

As the table ages, or due to temperature and humidity variations, the wood may shrink or expand, but this joint requires only a quarter turn on the nuts to keep it snugged up tight.

The top comes off to access the crate for storage, and this one is currently full of photo albums, you know, physical pictures, from before we let them pile up on the hard drive unseen.

Friday, February 13, 2009

My dog wants a bite of your sandwich.

Give the Pupster some sandwich, and a chip, he likes chips.

Monday, February 9, 2009

Sofa Table.

A sofa table or hall table is what you call any tall narrow occasional table. The usually stand along a wall, or behind a couch to hold miscellaneous stuff, key bowls, candles, books, etc...

This one I did for the living room, and my wife is loath to part with it, though I will gladly replicate it should anybody want one.

I say replicate, because there isn't any way to make a copy. The top of this table is made up of three planks of red cedar that weathered outside for at least forty years. They were shelves in a plant stand my grandfather made for his green house. When the stand finally had enough, and fell over, I pulled it apart to see what I could do.

I took of at least an eighth of an inch of soft silver surface wood before I reached the inner heart that wasn't burned by UV. It has a deep reddish leathery color that only time brings.

I tied the planks together on the under side with wood straps instead of jointing them and gluing them up into a solid top. It looks more rustic.

The legs and apron are ripped down fir 2x4s from salvage. They are a tapering square, like a pencil post leg, but the inner sides tapper more sharply than the outside. It helps to make the table look more open.

Before I painted the legs and apron, I first ran a bit of barn red paint along the edges and corners. Then after I gave it a couple coats of black satin over that, I rubbed along the edges with steel wool to let the red just barely show. It's a bit too subtle to show in the photo, you don't even notice it unless you're looking for it.

The top got several coats of satin polyurethane, and that really brought out the deep color of the wood. I'm pretty happy with this one overall, I just have to find more old cedar now.
Saturday, February 7, 2009

The Pantry.

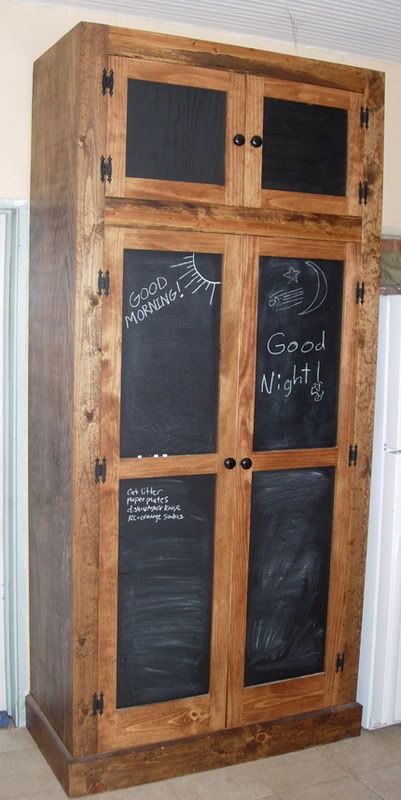
I just about bit off more than I could chew with this one. Part of the Perpetual Ongoing Remodel is the kitchen. We needed more storage for dry goods and cans, so I decided to build a free standing pantry, like a large armoire.
Large in this case ended up being eight foot six inches tall, by four feet wide, by twenty two inches deep. I couldn't stand it upright in the shop, and I had to call my brother over to help get it into the house.

I don't know what it weighs, but I don't want to move it again.

It has five adjustable shelves inside, and is open all the way across. Nearly everything in the kitchen fit inside it with room to spare. The stain is an early American, with a satin finish. All the door panels have several coats of chalkboard paint on them for doodles and lists. The knobs are oak with a few coats of black enamel.

As you see it in this picture, the pantry isn't completely finished. I plan on building a second short cabinet that will bolt to the side of it and cross the top of the refrigerator to attach to the wall. Then I will add crown moulding and a single top to both pieces.

This, like the picture panel bookcase, was entirely new wood. I would like to do a pantry or cupboard in salvaged wood, but the right pieces haven't come along yet. I'm patient though, they'll show up eventually.

Wednesday, February 4, 2009

Rough work.

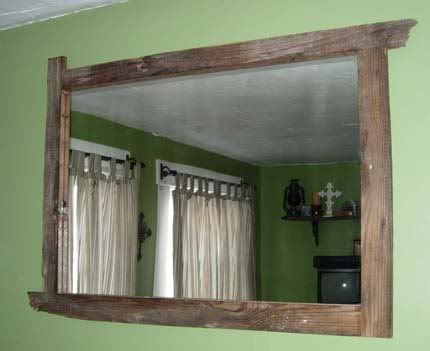
This mirror frame was a fast and rough build that only took a couple hours. I had the mirror sitting around for a long time without a frame and I got tired of having to move it when it got in the way.
The frame was a single old yellow pine plank with one end broken and one end clean. I ripped it lengthwise on the table saw and then chopped it into nearly equal lengths on the miter saw.
I ran a quarter inch rabbet groove around the inside and brought it together with pocket screws and a little glue.
I gave the frame a scrubbing with steel wool to deepen the unevenness in the grain and then a coat of stain. No finish on this one, I wanted it to look flat, like old barn wood.

I have another, much larger mirror to frame yet, that one will be a much more careful project.
I'm thinking maybe something sort of Arts & Crafts, a Green brothers look maybe. We'll see.